
| Enumerating Windows / Drawing desktop icon text transparently | Obtenir la liste des fenêtres / rendre le texte sous les icônes du desktop transparentes |
| 1. Enumerating windows | Obtenir la liste des fenêtres |
| The windows API contains many functions that allows you to enumerate windows or to get a handle for a particular window. Below are some of them with a brief description. | L'API windows contient toute une série de fonctions qui permettent d'obtenir la liste des fenêtres ou qui retournent un handle vers une fenêtre particulière. Voici certaines d'entre elles avec une brêve description. |
| FindWindow() | Retrieves
the handle of a Top-level Window. Donne le handle d'une fenêtre de Top-niveau. |
| Find WindowEx() | same
as FindWindow() but searches beginning with a given Child Window. Identique a FindWindow() mais commence le recherche avec une fenêtre fille spécifiée. |
| EnumWindows() | Enumerates
all Top-Level Windows on the screen using a callback function. Cette fonction permet d'obtenir toutes les fenêtres à l'écran en utilisant une fonction de callback. |
| EnumChildWindows() | Enumerates
all child windows that belong to a specified parent window. Uses a
callback function. Permet d'obtenir toutes les fenêtres filles d'une certaine fenêtre parent. Utilise une fonction de callback. |
| EnumDesktopWindows() | Enumerates
all windows from a desktop with a callback function. Donne toutes les fenêtres appartenant à un desktop au moyen d'une fonction de callback. |
| GetWindow() | Gets
the handle of a window that has a specified relationship to a given
window. Retourne le handle d'une fenêtre qui a une certaine relation avec la fenêtre spécifiée dans la fonction. |
| You have to pass to the functions, using a callback function, a pointer to your callback function. This function can't be a member function. So, you've to declare it outside your class. | Il faut passer un pointeur vers votre propre fonction de callback aux fonctions qui utilisent une fonction de callback. Comme cette fonction de callback ne peut être déclarée dans votre classe, vous devez le faire en dehors de celle-ci. |
| 2. Example | Exemple |
| Create a new project and put on your form a button and a ListView. Set its ViewStyle to vsReport and add 2 Headers, the first called WindowName and the second Classname. Put the code below in the .h and .cpp file. | Créez un nouveau projet. Placez sur la form un bouton et un ListView ayant comme ViewStyle, vsReport. Ajoutez deux headers à votre ListView. Le premier appelé WindowName et le second, ClassName. Ecrivez le code ci-dessous dans le fichier .h et .cpp de votre projet. |
|
//Unit1.h |
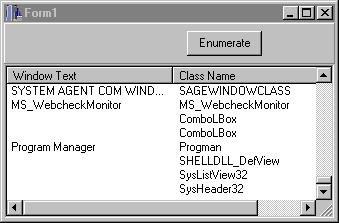
| After compiling your project, run it and you'll see all the child windows belonging to the desktop. | Après compilation, lancez le programme. Vous devez voir apparaître dans le ListView toutes les fenêtres filles appartenant au desktop. |
| 3. Drawing the desktop icon text transparently | Afficher le texte sous les icônes du desktop de façon transparente |
| If you're running Windows 95 or NT, the text under the desktop icons looks like this : | Si votre OS est toujours Windows 95 ou Windows NT, le texte qui apparaît sous les icônes du desktop ressemble à ceci : |

| How to make them appear like this instead : | Comment faire pour qu'elles apparaissent plutôt ainsi : |

| You have certainly heard that the desktop is in fact a ListView. If you look closer to the windows that belong to the desktop with the program you've build above, you'll see a window whose name is Program Manager and whose class name is Progman. This window has a child window whose class name is SHELLDLL_DefView whose child window class name is SysListView32. It is the ListView we are searching for. | Vous avez certainement déjà entendu dire que le desktop était constitué par un ListView. Si vous jetez un oeil sur les fenêtres filles du desktop au moyan du programme développé plus haut, vous pouvez voir qu'il y a une fenêtre appelée Program Manager dont une des fenêtres filles a un nom de classe qui est SysListView32. C'est le ListView que nous cherchons. |
| Windows gives us some messages we can send to a ListView to change the background text color or the text color. These are LVM_SETTEXTBKCOLOR and LVM_SETTEXTCOLOR. All we have to do is send to the listview the appropriate message with the desired color as parameter. | Nous disposons des messages LVM_SETTEXTBKCOLOR et LVM_SETTEXTCOLOR pour spécifier la couleur du texte et sous le texte d'un ListView. Tout ce que nous devons faire, c'est envoyer au ListView ces messages avec la couleur spécifiée en paramètre. |
|
HWND hwnd; |
| TextColor is a variable (long) that old the text color. You can assign to TextColor one of the C++ Builder constants like clBlack or clDkGray ... | TextColor est une variable de type long. Vous pouvez lui donner une des valeurs prédéfinies dans BCB comme par exemple clBlack ou clDkGray etc... |
| The color you choose is not saved by Windows. You have to run the function again every time you boot your computer. If you put this code in a program you have to place a shortcut in the startup folder. It could be interesting to put the code in the OnTimer event of a timer because some games, for example, don't restore the desktop to its previous state. | La couleur choisie n'est pas sauvée par windows. Vous devez donc relancer la fonction à chaque nouveau démarrage de Windows. La façon la plus simple est de créer un petit programme dont vous placerez un raccourci dans le menu démarrage de Windows. Il peut aussi être intéressant de mettre ce code dans l'événement OnTimer d'un Timer qui testera périodiquement la couleur choisie et la restaurera si besoin était parce que certain jeux, par exemple, ne restaure pas le desktop tel qu'il était avant leur lancement. |
| In the section called 'Applications' of this site, you'll find a complete program with source. | Dans la section 'Applications' de ce site, vous trouverez un programme complet basé sur le code expliqué plus haut. |